Read Data
We need API KEY information for retrieving the data of temperature, damp, voltage, light etc. values like that which are sending Iot device.Datas which are sending from your Iot device can monitore with mobile devices like Pi, Android, iOs or your website.
For example; Assume that our device’s name “Temperature sensor” and it will be in the device additionally assume that our sensors “temperature” and “humidity”
Data Retrieving with Python 2, Python 3 Json
Get Example with Python Json: The number of data specified by results was read,by using the requests.get method from the IOTHOOK server Up to 99 pieces of data can be read with the results variable. If the results variable is not specified, only 1 data can be read. The format of readed data is json
The following output is obtained, by running the following Python script.
>>> [{'id': 502483, 'device': 17, 'field_1': '46', 'field_2': '6.70', 'field_3': None, 'field_4': None, 'field_5': None, 'field_6': None, 'field_7': None, 'field_8': None, 'pub_date': '2019-08-31T00:57:27.086837', 'remote_address': '88.242.132.150&python-requests/2.12.4&HTTP/1.1'}]
>>> 1
>>> 502483
You can find this example and others on the IOTHOOK Git page.
# -*- coding: utf-8 -*-

"""
    IoThook REST Api Test with Python 2, Python 3

    This example is at the beginner level for sending/receiving data to the IotHook service.
    it aims to carry out tests.

    10 May 2017
    Update: 19 August 2019
    Sahin MERSIN

    For more

    http://www.iothook.com
    and
    https://github.com/electrocoder/iotHook

    go to theese sites

    For questions and support requests
    https://github.com/electrocoder/iotHook/issues
    you can take support Mese Bilisim or above github page.


    Broadcasting : http://mesebilisim.com


    Licensed under the Apache License, Version 2.0 (the "License").
    You may not use this file except in compliance with the License.
    A copy of the License is located at

    http://www.apache.org/licenses/

"""

import requests

# read api key
API_KEY = 'b5d91b83c85276cddc84eb67' # demo account #100 Demo Data HTTP random test

url = 'http://iothook.com/api/device/?api_key=' + API_KEY + "&results=1"

response = requests.get(url)
data = response.json()
print(data)
print(len(data))
print(data[0]['id'])
Getting the First Data with Python 2, Python 3 Json
Python Getting the First Data, Get Example with Json:
You can find this example and others on the IOTHOOK Git page.
# -*- coding: utf-8 -*-

"""
    IoThook REST Api Test with Python 2, Python 3

    This example is at the beginner level for sending/receiving data to the IotHook service.
    it aims to carry out tests.

    10 May 2017
    Update: 19 August 2019
    Sahin MERSIN

    For more

    http://www.iothook.com
    and
    https://github.com/electrocoder/iotHook

    go to theese sites


    For questions and support requests
    https://github.com/electrocoder/iotHook/issues
    you can take support Mese Bilisim or above github page.


    Broadcasting : http://mesebilisim.com

    Licensed under the Apache License, Version 2.0 (the "License").
    You may not use this file except in compliance with the License.
    A copy of the License is located at

    http://www.apache.org/licenses/

"""

import requests

# read api key
API_KEY = 'b5d91b83c85276cddc84eb67' # demo account #100 Demo Data HTTP Temperature sensor

url = 'https://iothook.com/api/device/?api_key=' + API_KEY + "&results=2"

response = requests.get(url)
data = response.json()
print(data)
print(data['datas'][0]['id'])
print(data['datas'][0]['pub_date'])
print(data['datas'][1]['id'])
print(data['datas'][1]['pub_date'])
Getting the Last Data with Python 2, Python 3 Json
Python Getting the Last Data, Get Example with Json:
You can find this example and others on the IOTHOOK Git page.
# -*- coding: utf-8 -*-

"""
    IoThook REST Api Test with Python 2, Python 3

    This example is at the beginner level for sending/receiving data to the IotHook service.
    it aims to carry out tests.

    10 May 2017
    Update: 19 August 2019
    Sahin MERSIN

    For more

    http://www.iothook.com
    and
    https://github.com/electrocoder/iotHook

    go to theese sites

    For questions and support requests
    https://github.com/electrocoder/iotHook/issues

    you can take support Mese Bilisim or above github page.
    Broadcasting : http://mesebilisim.com

    Licensed under the Apache License, Version 2.0 (the "License").
    You may not use this file except in compliance with the License.
    A copy of the License is located at

    http://www.apache.org/licenses/

"""

import requests

# read api key
API_KEY = 'b5d91b83c85276cddc84eb67' # demo account #100 Demo Data HTTP Temperature sensor

url = 'https://iothook.com/api/device/?api_key=' + API_KEY

response = requests.get(url)
data = response.json()
print(data)
print(data['datas'][0]['id'])
print(data['datas'][0]['pub_date'])
Fetching Data in JSON Format with C#
It has been produced with the GET method using Postman so that the IoThook user can use the data of his device.
You can find this example and others on the IOTHOOK Git page.
/*
    Testing IoThook REST Api with C#

    In this example, device data is retrieved with CSharp with the get method.

    This example is at the beginner level for sending/receiving data to the IotHook service.
    it aims to carry out tests.

    29 July 2017
    Update: 19 August 2019
    Sahin MERSIN

    For more

    http://www.iothook.com
    and
    https://github.com/electrocoder/iotHook

    go to theese sites

    For questions and support requests
    https://github.com/electrocoder/iotHook/issues
    you can take support Mese Bilisim or above github page.

    Broadcasting : http://mesebilisim.com

    Licensed under the Apache License, Version 2.0 (the "License").
    You may not use this file except in compliance with the License.
    A copy of the License is located at

    http://www.apache.org/licenses/
*/

// demo account #100 Demo Data HTTP

var client = new RestClient("https://iothook.com/api/device/?api_key=9e722c4fc6c834b15ba01e86&results=1");
var request = new RestRequest(Method.GET);
request.AddHeader("cache-control", "no-cache");
request.AddHeader("Connection", "keep-alive");
request.AddHeader("Accept-Encoding", "gzip, deflate");
request.AddHeader("Host", "iothook.com");
request.AddHeader("Postman-Token", "ce2f06c2-817e-414a-8c7a-2c2fc59ad043,af31a3d8-02e4-49eb-b78f-05ebdce70149");
request.AddHeader("Cache-Control", "no-cache");
request.AddHeader("Accept", "*/*");
request.AddHeader("User-Agent", "PostmanRuntime/7.15.2");
IRestResponse response = client.Execute(request);
IOT Data Fetching with GO
It has been produced with the GET method using Postman so that the IoThook user can use the data of his device.
You can find this example and others on the IOTHOOK Git page.
// Go HTTP GET

package main

import (
    "fmt"
    "net/http"
    "io/ioutil"
)

func main() {

    url := "https://iothook.com/api/device/?api_key=9e722c4fc6c834b15ba01e86&results=1"

    req, _ := http.NewRequest("GET", url, nil)

    req.Header.Add("User-Agent", "PostmanRuntime/7.15.2")
    req.Header.Add("Accept", "*/*")
    req.Header.Add("Cache-Control", "no-cache")
    req.Header.Add("Postman-Token", "ce2f06c2-817e-414a-8c7a-2c2fc59ad043,8a0938fc-5c87-459a-9b9f-fa6aebe561f2")
    req.Header.Add("Host", "iothook.com")
    req.Header.Add("Accept-Encoding", "gzip, deflate")
    req.Header.Add("Connection", "keep-alive")
    req.Header.Add("cache-control", "no-cache")

    res, _ := http.DefaultClient.Do(req)

    defer res.Body.Close()
    body, _ := ioutil.ReadAll(res.Body)

    fmt.Println(res)
    fmt.Println(string(body))

}
IOT Data Fetching with JAVA
It has been produced with the GET method using Postman so that the IoThook user can use the data of his device.
You can find this example and others on the IOTHOOK Git page.
OkHttpClient client = new OkHttpClient();

Request request = new Request.Builder()
    .url("https://iothook.com/api/device/?api_key=9e722c4fc6c834b15ba01e86&results=1")
    .get()
    .addHeader("User-Agent", "PostmanRuntime/7.15.2")
    .addHeader("Accept", "*/*")
    .addHeader("Cache-Control", "no-cache")
    .addHeader("Postman-Token", "ce2f06c2-817e-414a-8c7a-2c2fc59ad043,bdcd2494-5109-4621-8256-296e0c6a4fad")
    .addHeader("Host", "iothook.com")
    .addHeader("Accept-Encoding", "gzip, deflate")
    .addHeader("Connection", "keep-alive")
    .addHeader("cache-control", "no-cache")
    .build();

Response response = client.newCall(request).execute();
IOT Data Fetching with PHP
It has been produced with the GET method using Postman so that the IoThook user can use the data of his device.
You can find this example and others on the IOTHOOK Git page.
<?php

$request = new HttpRequest();
$request->setUrl('https://iothook.com/api/device/');
$request->setMethod(HTTP_METH_GET);

$request->setQueryData(array(
    'api_key' => 'b5d91b83c85276cddc84eb67',
    'results' => '1'
));

$request->setHeaders(array(
    'cache-control' => 'no-cache',
    'Connection' => 'keep-alive',
    'Accept-Encoding' => 'gzip, deflate',
    'Host' => 'iothook.com',
    'Postman-Token' => 'ce2f06c2-817e-414a-8c7a-2c2fc59ad043,dfad2e87-d4a1-4657-a5b6-183c4604c818',
    'Cache-Control' => 'no-cache',
    'Accept' => '*/*',
    'User-Agent' => 'PostmanRuntime/7.15.2'
));

try {
    $response = $request->send();

    echo $response->getBody();
} catch (HttpException $ex) {
    echo $ex;
}
IOT Data Fetching with Ruby
It has been produced with the GET method using Postman so that the IoThook user can use the data of his device.
You can find this example and others on the IOTHOOK Git page.
require 'uri'
require 'net/http'

url = URI("https://iothook.com/api/device/?api_key=b5d91b83c85276cddc84eb67&results=1")

http = Net::HTTP.new(url.host, url.port)

request = Net::HTTP::Get.new(url)
request["User-Agent"] = 'PostmanRuntime/7.15.2'
request["Accept"] = '*/*'
request["Cache-Control"] = 'no-cache'
request["Postman-Token"] = 'ce2f06c2-817e-414a-8c7a-2c2fc59ad043,8fe93ff6-b857-4978-838e-2d8efac2e6b6'
request["Host"] = 'iothook.com'
request["Accept-Encoding"] = 'gzip, deflate'
request["Connection"] = 'keep-alive'
request["cache-control"] = 'no-cache'

response = http.request(request)
puts response.read_body
IOT Data Fetching with Javascript Ajax
It has been produced with the GET method using Postman so that the IoThook user can use the data of his device.
You can find this example and others on the IOTHOOK Git page.
var settings = {
    "async": true,
    "crossDomain": true,
    "url": "https://iothook.com/api/device/?api_key=9e722c4fc6c834b15ba01e86&results=1",
    "method": "GET",
    "headers": {
      "User-Agent": "PostmanRuntime/7.15.2",
      "Accept": "*/*",
      "Cache-Control": "no-cache",
      "Postman-Token": "ce2f06c2-817e-414a-8c7a-2c2fc59ad043,27a5bb35-4b13-48b2-8dbd-efe7188a68c6",
      "Host": "iothook.com",
      "Accept-Encoding": "gzip, deflate",
      "Connection": "keep-alive",
      "cache-control": "no-cache"
    }
  }

  $.ajax(settings).done(function (response) {
    console.log(response);
  });
IOT Data Fetching with Python PySide2
PySide2 is the official Python module that provides access to the Qt 5.12+ framework for Python projects. Before using PySide2, the following modules need to be installed
$ pip install matplotlib
$ pip install numpy
$ pip install PySide2
The installation of Python libraries has been done using pip. If pip is not installed on your system, you can visit the following address, https://bootstrap.pypa.io/get-pip.py, to download the file to your computer and run it.
Here, we will use PySide2 and Matplotlib to display the incoming data as a graph within a Window.
When the script is executed, we should see a window like the one shown below.
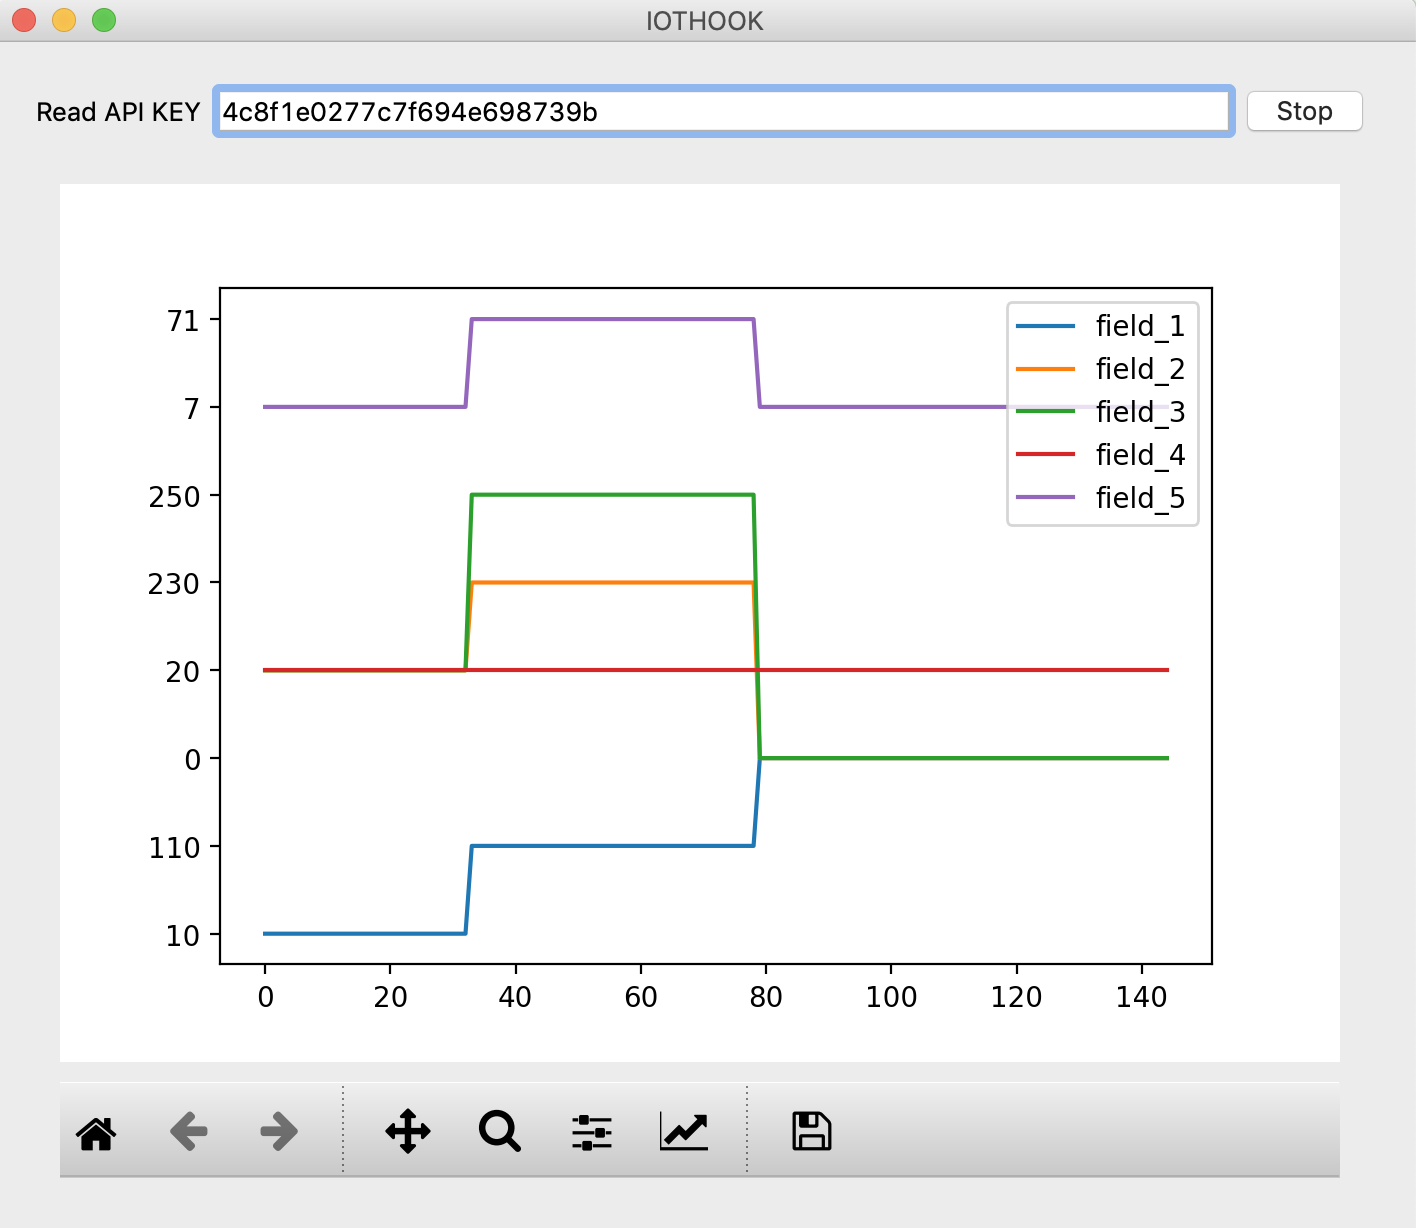
In this example, the interface design was created using QT Designer. For the widget,*Promote to …* option was used with the MplWidget class. In prepearing this example manap.se Manap and yapayzekalabs.blogspot.com Yapayzekalabs used this sites. You can find more resources at these sites.
- The test process was carried out with a device named 5 channel test with id number 230 in IoThook.
This device belongs to demo user
You can find this example and others on the IOTHOOK Git page.
iothook.ui folder:
<?xml version="1.0" encoding="UTF-8"?>
<ui version="4.0">
 <class>Form</class>
 <widget class="QWidget" name="Form">
  <property name="geometry">
   <rect>
    <x>0</x>
    <y>0</y>
    <width>689</width>
    <height>553</height>
   </rect>
  </property>
  <property name="windowTitle">
   <string>Form</string>
  </property>
  <layout class="QGridLayout" name="gridLayout">
   <item row="0" column="0">
    <widget class="QLabel" name="label">
     <property name="text">
      <string>Read API KEY</string>
     </property>
    </widget>
   </item>
   <item row="0" column="1">
    <widget class="QLineEdit" name="lineEdit"/>
   </item>
   <item row="0" column="2">
    <widget class="QPushButton" name="pushButton">
     <property name="text">
      <string>Connect</string>
     </property>
    </widget>
   </item>
   <item row="1" column="0" colspan="3">
    <widget class="MplWidget" name="MplWidget" native="true"/>
   </item>
  </layout>
 </widget>
 <customwidgets>
  <customwidget>
   <class>MplWidget</class>
   <extends>QWidget</extends>
   <header>mplwidget.h</header>
   <container>1</container>
  </customwidget>
 </customwidgets>
 <resources/>
 <connections/>
</ui>
iothook.py folder:
"""
  Python ile IoThook REST Api Testi

  IoThook'da her cihazin bir kimlik numarasi APIKEY'i vardir.
  Bu APIKEY kullanilarak veriler IoThook'a GET metodu gonderilir ve cihaz detay verileri alinir.
  PySide2 ile arayuz olusturulmustur.

  Bu ornek IotHook servisine veri almak/gondermek icin baslangic seviyesinde
  testlerin yapilmasini amaclamaktadir.

  v1 : 19 Agustos 2019
  v2 : 31 Ekim 2022

  Sahin MERSIN - electrocoder

  Daha fazlasi icin

  http://www.iothook.com
  https://www.mesebilisim.com
  https://mesemekatronik.com
  https://electrocoder.blogspot.com
  https://github.com/meseiot/iotexamples

  sitelerine gidiniz.

  Yayin : http://mesebilisim.com

  Licensed under the Apache License, Version 2.0 (the "License").
  You may not use this file except in compliance with the License.
  A copy of the License is located at

  http://www.apache.org/licenses/
"""

import requests
from PySide2.QtWidgets import *
from PySide2.QtUiTools import QUiLoader
from PySide2.QtCore import QFile, QTimer

from matplotlib.backends.backend_qt5agg import (
    FigureCanvas, NavigationToolbar2QT as NavigationToolbar)

from matplotlib.figure import Figure

import numpy as np
import random


class MplWidget(QWidget):

    def __init__(self, parent=None):
        QWidget.__init__(self, parent)

        self.canvas = FigureCanvas(Figure())

        vertical_layout = QVBoxLayout()
        vertical_layout.addWidget(self.canvas)
        vertical_layout.addWidget(NavigationToolbar(self.canvas, self))

        self.canvas.axes = self.canvas.figure.add_subplot(111)
        self.setLayout(vertical_layout)


class MainWidget(QWidget):

    def __init__(self):
        QWidget.__init__(self)

        designer_file = QFile("iothook.ui")
        designer_file.open(QFile.ReadOnly)
        loader = QUiLoader()
        loader.registerCustomWidget(MplWidget)
        self.ui = loader.load(designer_file, self)
        designer_file.close()

        self.setWindowTitle("IOTHOOK")

        self.field_1_list = []
        self.field_2_list = []
        self.field_3_list = []
        self.field_4_list = []
        self.field_5_list = []
        self.field_6_list = []
        self.field_7_list = []
        self.field_8_list = []

        self.lineEdit = self.ui.findChild(QLineEdit, 'lineEdit')
        self.pushButton = self.ui.findChild(QPushButton, 'pushButton')

        self.pushButton.clicked.connect(self.result)

        grid_layout = QGridLayout()
        grid_layout.addWidget(self.ui)
        self.setLayout(grid_layout)

    def result(self):
        self.timer = QTimer()
        self.timer.setInterval(5000)
        self.timer.timeout.connect(self.status)
        self.timer.start()

    def status(self):
        print("update")
        # demo account API_KEY
        # https://iothook.com/en/device/data/100/
        # 100 - Demo Data HTTP
        # API_KEY = 'b5d91b83c85276cddc84eb67'  # read api key
        API_KEY = self.lineEdit.text()
        if API_KEY:
            self.pushButton.setText("Stop")
            url = 'http://iothook.com/api/device/?api_key=' + API_KEY + "&results=1"
            response = requests.get(url)
            data = response.json()
            print(data)

            try:
                self.ui.MplWidget.canvas.axes.clear()
                self.field_title_list = []

                if data[0]['field_1']:
                    self.field_title_list.append('field_1')
                    self.field_1_list.append(data[0]['field_1'])
                    self.ui.MplWidget.canvas.axes.plot(self.field_1_list)

                if data[0]['field_2']:
                    self.field_title_list.append('field_2')
                    self.field_2_list.append(data[0]['field_2'])
                    self.ui.MplWidget.canvas.axes.plot(self.field_2_list)

                if data[0]['field_3']:
                    self.field_title_list.append('field_3')
                    self.field_3_list.append(data[0]['field_3'])
                    self.ui.MplWidget.canvas.axes.plot(self.field_3_list)

                if data[0]['field_4']:
                    self.field_title_list.append('field_4')
                    self.field_4_list.append(data[0]['field_4'])
                    self.ui.MplWidget.canvas.axes.plot(self.field_4_list)

                if data[0]['field_5']:
                    self.field_title_list.append('field_5')
                    self.field_5_list.append(data[0]['field_5'])
                    self.ui.MplWidget.canvas.axes.plot(self.field_5_list)

                if data[0]['field_6']:
                    self.field_title_list.append('field_6')
                    self.field_6_list.append(data[0]['field_6'])
                    self.ui.MplWidget.canvas.axes.plot(self.field_6_list)

                if data[0]['field_7']:
                    self.field_title_list.append('field_7')
                    self.field_7_list.append(data[0]['field_7'])
                    self.ui.MplWidget.canvas.axes.plot(self.field_7_list)

                if data[0]['field_8']:
                    self.field_title_list.append('field_8')
                    self.field_8_list.append(data[0]['field_8'])
                    self.ui.MplWidget.canvas.axes.plot(self.field_8_list)

                self.ui.MplWidget.canvas.axes.legend((self.field_title_list), loc='upper right')
                self.ui.MplWidget.canvas.draw()

                self.repaint()
            except:
                pass


app = QApplication([])
window = MainWidget()
window.show()
app.exec_()